The symbols on a sewing pattern might look confusing to anyone unfamiliar with them, but once understood, they are extremely helpful in getting the most out of the pattern. Try to look over your pattern before you begin to cut and make a mental note of any of these points that you will need to transfer to your fabric, like darts, notches, buttons, and buttonholes. Always mark these when your fabric is still flat on the cutting table (or if you are like me, the floor!), as once you move your cut fabric it will be tricky to find t the correct spot again.

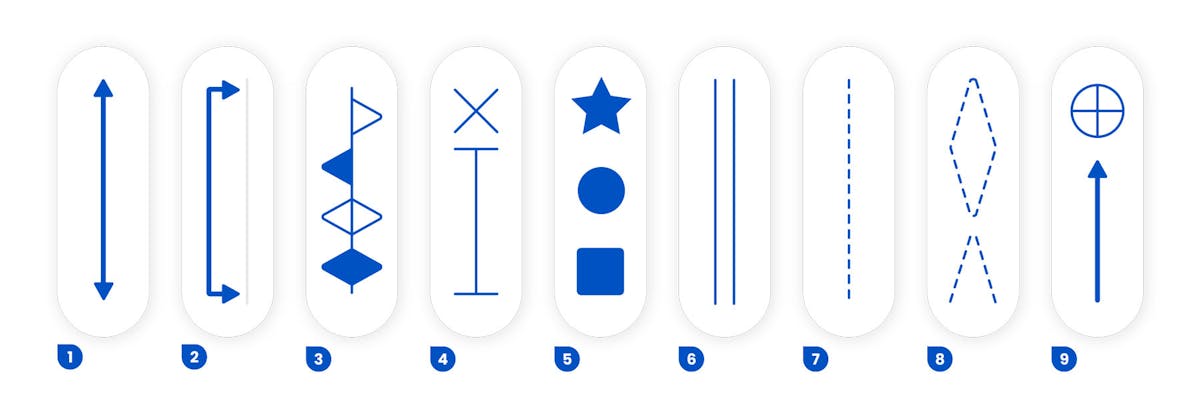
- Grainline - Every commercial pattern will have this double-ended arrow known as a grainline, running down the length of the pattern piece. The grainline on your pattern should always stay perfectly parallel with the selvage of the fabric, so use a measuring tape to make sure the distance between each arrow and the selvage is equal.
- Place On Fold - This bent double-ended arrow signifies that the edge it is pointing to should be placed right along a folded edge of the fabric, with no seam allowance added. When folding the fabric in half, make sure the selvages are parallel to each other so that your folded edge is on the correct grainline. By cutting on a fold you can be sure that your piece will be cut perfectly symmetrical. This is often used when cutting the back piece of tops or dresses.
- Notches - You will probably notice small triangles scattered around the outer edges of your pattern pieces. These are notches, used to help you match up your pieces correctly when pinning and sewing. You can mark these points by cutting outwards around the triangle. As a general rule, single triangles are used for the front parts of garments, and double or triple triangles are used to match back pieces, like center back and back sleeve.
- Buttons & Buttonholes - A cross or ‘X’ symbol will show you the spot where a button needs to be attached. The middle point of the ‘X’ should line up with the middle of the button. Marking the button placement should ideally be done when your pieces are still flat so that they will be in the right place for the corresponding buttonholes. The Buttonhole placement is instead marked using a straight line with closed ends. This should be marked on the fabric using tacks or chalk. The perpendicular bars at each end signify the length of the buttonhole, or where it should start and finish.
- Additional Shapes - Small shapes like squares and circles are used to match points together, or as a point to mark for referencing. You might find one on a stitch line to indicate where to stop sewing to leave enough space for a zipper, or they could be used in the same way notches are used – to help you understand how your pattern pieces fit together later. Often your pattern instructions will have a key to help you decode these shapes.
- Lengthen or Shorten Lines - These two parallel lines running across the width of your pattern show the best spot to add or remove length to the garment. You can fold it up to make the pattern shorter or cut between the two lines and add some additional paper to make it longer. Once the length has been altered to suit, you will need to check the outer edge and redraw the cutting line so it is smooth.
- Stitch Lines - Most commercial patterns won’t have stitch lines around every piece but you may still find these dashed lines in some places on the pattern. They are often used to show where to stitch a dart, a zipper, and uncommon seam allowances. If you are unsure about the overall seam allowance that the pattern uses, check the pattern instructions as they should tell you there.
- Darts - This dashed line is the same as a stitch line and is used to show how you should sew up a dart. You can mark using a basting stitch or chalk while cutting out your pattern to transfer these lines to your fabric. If the dart legs (sew lines) start on an outer edge, you may notice a bump between the two legs that does not seem to match the shape of the outer edge. When the dart is sewn shut it will need this extra shaping to sit flush with the outer edge, so make sure to follow this when cutting.
- Bust Point - A circle with a cross or X in the middle shows the center bust point or apex point. It is a reference point that will help you if you need to make adjustments to the fit of your pattern before cutting. You usually don't need to transfer this point to your fabric.
Learning about the different symbols and even how to cut patterns out is often something that's passed down from the person who taught us how to sew. If you (or the person who taught you) are self-taught, then this information can quickly go out the window when there is so much else to remember. But once understood, these small keys on the pattern quickly unlock so many possibilities customization and a better fit. For more sewing tips check out our Tips & Tricks blog post and let us know in the comments if you have come across some more unusual symbols on your patterns!


